Halloween, that playful, spooky fun holiday that’s a treat for kids, and adults alike. Traditionally, it’s filled with candy, and caramel apples, popcorn balls, and all kinds of sweet treats. As a child, in a rural area, it was a four mile walk to gather those treats, sometimes in sleet, or snow, usually wearing store bought costumes that just barely fit over our coats. But we didn’t care. We were together with our f reins, walking past the cemetery, gathering treats, trying to scare each other, or better yet, our younger siblings. I only wish my parents had known recipes such as the ones I’m giving to you here. Are you ready for some delicious, healthy Halloween recipes? Then let’s get this party started.
No Jacqueline, you can’t dance on the table. This is a cooking lesson, not a real party.
First up, Mummy Head Meatballs:
Strips of buttery, flaky crust surround meatballs, with eyes made from dots of cheese create these yummy finger foods.
We are making our crust differently than in the past,
What’s that Tom? Won’t butter cause the gluten to develop, making a tough crust?
Well . it’s true that butter contains water, and that water is required for gluten to develop. We avoid that here with proper technique. The butter gives this crust a delicate, rich flavor. Here’s how we make it
2 ½ cups (325 grams) all-purpose flour
1 teaspoon kosher salt
1 tablespoon sugar, optional
1 cup (230 grams) very cold unsalted butter, cut into 1/2-inch cubes (2 sticks)
4 to 8 tablespoons ice water
Class, you can either make this dough with a food processor, or by hand. Using the food processor is faster, except that there are more dishes to wash, but both give great results.
So, first we’[re gong to do this in the food processor. Place all of the butter, chilled, and cut into little squares, and 1 ½ cups of the flour into the food processor. Pulse the mixture until it looks lie a coarse sand. Add the remaining flour, and salt. Pulse to make a pea-gravel texture.
Pour this mixture into a mixing bowl Add the water, and fold it in just until the dough begins to make a workable dough. Tran fer the dough onto a floured work surface. Form into a disk by punching it down with your hads. Dust the top with flour, and roll until you get the thickness of a tortilla. Cut into ¼ inch strips. Place into a zipper bag and refrigerate.
If making without the food processor, use the same technique, mixing the butter with 1 ½ cups of flour, cutting them together with a pastry cutter until sandy texture is achieved. Cut in the salt, and remaining flour to make pea gravel texture. Add water, and form dough. Roll out, then cut into strips. Now, onto the meatballs.
For traditional, Italian meatballs, A grated hard cheese, such as Asiago, Parmigiana- Reggiano, or Pecorino Romano is added, along with milk, and breadcrumbs. However, we will skip the cheese, and milk to make these meatballs safe for those suffering from kidney disease. Well use ice milk instead of milk, and add lots of flavor with herbs ans spices.
Ingredients:
1.5 lbs. Ground pork
1 lb. 80/20 Ground Beef
1 tsp. Salt
1 tsp. dried Oregano
1 tbs. Smoked paprika
1 tbs. Granulated Garlic
2 tsp. Granulated Onion Powder
1 tsp. Cayenne pepper (optional)
1 tsp. Ground cumin
½ tsp. Ground coriander
2 tbs chili powder
1 large, raw egg
½ cup rice milk
½ cup Panko Breadcrumbs.
Place all ingredients into a large mixing bowl Mix together with hands until all is evenly mixed. Form 2 inch meatballs either with a spring loaded cookie scoop, or your hands. Place meatballs onto a parchment lined cookie sheet, and bake for 30 minutes. Remove and let cool.
Wrap the meatballs with the cut strips, leaving an opening for the face. Cut dots of white cheese for the eyes, and press into the meatballs. Place all back into the oven. Bake an additional 20 minutes. Remove, and serve.
Meatball Eyeballs
This is a gruesome looking dish that will delight all of the little, and big monsters in your home. It’s warm, filling, and oh so satisfying. This time. we/ll be making eyeball sized meatballs, and a red, roasted pepper sauce that resembles, yep, you guessed it, blood. A little Monterey Jack cheese coats the meatballs, with olives forming the pupils, all sitting on sauce, and spaghetti noodles. Believe me, with this sauce, you won’t miss the tomato. What could be better?
First, the sauce:
Ingredients:
6 medium red, sweet peppers
2 tbs. extra virgin olive oil
1 medium onion, finely chopped
2 large garlic cloves, peeled, and minced
½ tsp. Salt
¼ tsp. Dried rosemary
½ tsp. Summer savory
½ tsp. Dried basil
¼ teaspoon red chili flakes
Cut the peppers in half, from top to bottom. Remove the stems, and seeds from the peppers. Place skin-side uponto foil lined baking sheet. Place into 400’ F. Oven, and bake for 15 minutes.
While the peppers are baking, peel, and mince the onion. Peel and mince the garlic. Heat oil in a heavy skillet until shimmering (360’ F). Add onion and saute until translucent. Add the garlic. Reduce heat to simmer.
Remove the peppers from the oven, and mince. Save the baking sheet for making the eyeballs. Pour off any pepper juice into the pan with the onions, and garlic. Add the remaining ingredients. Simmer until a lovely sauce has formed (about 20 minutes). Let cool while making the meatballs.
Meatballs:
Ingredients:
1.5 lbs. Ground pork
1 lb. 80/20 Ground Beef
1 tsp. Salt
1 tsp. dried Oregano
1 tsp. Dried basil
1 tsp. Dried rosemary
½ tsp. Dried thyme
1 tbs. Granulated Garlic
2 tsp. Granulated Onion Powder
1 tsp. Cayenne pepper (optional)
1 large, raw egg
½ cup rice milk
½ cup Panko Breadcrumbs.
Combine all ingredients in a large mixing bowl. Fold together until all ingredients are evenly distributed. Form into eyeball sized meatballs, and place into a large skillet/Dutch oven. Add ½ cup water. Cover and simmer for 20 minutes.
Transfer the meatballs onto the baking sheet. Cover each meatball with a thin square of the Monterey Jack cheese. Preheat the oven to 400’ F. Place into your oven for about five minutes, just long enough to melt the cheese.
Cook enough linguine, or spaghetti for your crew. When al dente, drain, and mix with the sauce, reserving ½ cup of sauce for decoration.
Remove the meatballs from the oven. Place a slice of black olive on top of each eyeball to form a black pupil. Spread noodles and sauce onto a large serving platter. Place eyeballs on top. Spoon a little of the remaining sauce onto eyeballs, to resemble blood. Use a toothpick to draw veins on top of the eyes to resemble bloodshot eyes. Serve.
Edible Cemetery
You can use large, pitted olives, coupled with buttery Ritz crackers for tombstones, and ground beef for the dirt to create this ghoulish favorite. A few broccoli flowerettes, with stems, create trees in this landscape, with broken pretzels coming out of the base to resemble worms. If you want to, you can even create ghosts from mozzarella, or provolone cheese.
Bug Ingredients:
Large pitted olives, Castelvetrano , black, Kalamata, whatever you like. Mix several types.
Cut each olive in half, lengthwise. Slice one half of each olive into six slices, sideways to the length. To make the bugs, lay an olive half on top of the six legs, poking out sideways from underneath, to make up legs. Do this on the dirt.
Dirt:
1 lb. 80/20 ground beef
¼ tsp. Baking soda
1 tsp. Granulated garlic (keeps the vampires away)
1 packet Knorr Brown Gravy mix, or 2 tbs Better Than Bouillon Beef Soup Base
Heat heavy skillet over medium high heat for 5 minutes. Add ground beef mixture. Break up as the meat is cooling, stirring until well browned. Add 1 tbs, flour and stir until the meat is coated with the four. Add beef soup base, and 1/4 cup of water. Stir until thickened.
Tombstones:
Ritz, or Townhouse crackers, or both
2 tbs. Flour-butter1/2 tsp salt
2 tbs. Butter
Heat butter in a skillet. Add flour, and salt. Stir until medium brown, but not burnt. Use a tooth pick dipped in brown roux to write RIP on each cracker.
Trees:
Steam broccoli for five minutes. Place into ice water to shock the veggie so that it retains its vibrant color, and stop cooking.
Ghosts:
Fill metal, greased, ghost shaped cookie cutters with shredded mozzarella cheese. Place into 350’F. Oven until cheese is melted(about 5 minutes). Remove and let cool.
Assembly:
Spread meat mixture onto a serving platter, about a half inch thick. Place broccoli strategically in place, with the stems pressed into the ground beef. Place tombstones into the ground beef, pressing gently in to stand up. Make your bugs around the tombstones. Remove the cheese ghosts from the cookie cutters, and place into your cemetery. Serve.
For the kids, purchase a small pumpkin for each child. Remove the top, and then the seeds. Cut in mini jack-o-lantern faces. Rub the inside with butter, sugar, and pumpkin pie spice, or go savory wit salt and pepper. Bake in 350’ F. Oven for 45 minutes. Erve each child there own edible jack-o-lantern
For desert, well, caramel apples of course.
I hope one of these recipes will tickle you fancy, and taste buds. They are all yummy. And fun.
From the Kitchen of Bob Flowers
If you love his, share it with family, and friends:
No matter you favorite 4th of July meal, one of these is sure to please. From top to bottom, we have burgers, prepped and ready for the grill, Beef Fajitas, Honey-glazed duck, and Smoked beef tenderloin. Unfortunately, for those of us on dialysis, sausages, hot dogs, and cured meats are off of our menu. These recipes will make sure that you don’t miss them.
First the burgers. I make mine just a little different. My technique eliminates shrinkage, and guarantees a juicy, tender grilled burger. This picture shows clearly what I do differently: You see corectly, I add one large egg to the uncooked ground beef. I use 80/20 ground round, as it hs great flavor. Simply work the egg into the ground beef, then form into patties. Don’t compress the burger patties, You want the round, with smooth edges, and slightly thinner in the middle. Place the patties over a solid bed of charcoal, and season with Salt & Pepper. Frill for four minutes per side. Enjoy you juicy burger on grilled buns, with lettuce chopped onion, relish, dill pickles, and maybe a little ketchup. Yum.
Beef Fajitas: Traditionally, fajitas are made with skirt steak, though flank steak, and hangar steak work equally well. The meat is marinated for three hous or so to both flavor and tenderize.
Here’s the marinade: ⅓ cup lime juice ¼ cup fresh, uncooked pineapple juice (pineapple has enzymes that tenderize meat\ tablespoons Worcestershire sauce 3 tablespoons olive oil 1 tablespoon minced garlic 2 teaspoon EACH: ground cumin AND chili powder 1 teaspoon EACH: kosher salt AND smoked paprika ½ teaspoon EACH: black pepper AND red pepper flakes (or more to taste) ¼ cup chopped cilantro Fajitas: 1 ½ – 2 pounds skirt or flank steak 1 tablespoon oil (high heat) medium white onions, sliced 1 large poblano, ribs and seeds removed then sliced 2-3 bell peppers, thinly sliced (red, yellow, and orange) Combine the marinade ingredients ina glass, or stainless steel bowl Slice the beef against the grain, into thin strip. Place into the marinade. Cover with plastic wrap and let sit in fridge for at least 2 hours.
Slice the peppers, and onion into strips. Cover, and set aside. After the 2 hours has elapsed, fire up the charcoal, or gas grill, I prefer charcoal. Use tongs to place meat strips over the fire. Cook for 4 minutes, the remove to a platter. Add 2 tbs. Cooking oil to a havy frying pan over medium-high heat. Add the sliced veggies and sautee until slightly tender, but not mushy. Add the beef strips to the pan, along with the marinade. Cook for 5 more minutes. Remove from heat and serve on corn tortillas.
Honey Glazed Duck Felling adventurous? This honey glazed duck is a show stopper, but takes some time to prepare. It is patterned after Peking Duck, but without all of the sides of that meal. First, we start with the duck. Hang the duck in a cool place, with a fan blowing air onto it, as shown: Make a solution of 1 cup honey, and 1 cup water. Paint the duck skin with the honey/water. Let dry. Repeat this process four times. Place charcoal into two beds on either side of the grill. Place a disposable aluminum loaf pan between the hot charcoal filled with 2 cups water. Place the duck, breast sideup, over the drip pan. Roast to an internal temp. Of 150’ F. Slice, and serve.
Finally, I give you Roasted Beef Tenderloin Tenderloin, though a favorite beef cut due to its tenderness, doesn’t have ss much flavor as a sirloin, or rib steak. We are going to make this tenderloin so very flavorful.
We will make a compound butter to add both flavor, and a beautiful crust on our beef. The compound butter wll be used two ways, injected into the roast, and rubbed all over it. Grilling over a diced bed of charcoal will take it over the top.
COMPOUND BUTTER: 2 sticks (8 oz) salted butter, softened to room temperature ½ cup chopped fresh herbs such as rosemary, sage, summer savory, and thyme 1 small shallot fmiced 1 garlic clove crushed Kosher salt and freshly ground black pepper
Combine the compound butter ingredients, stirring until well blended. Divide into 2 parts.
Grilled Beef Tenderloin 1 (6-to 7-pound) whole beef tenderloin 1 tablespoon extra-virgin olive oil 2 tablespoons coarsely ground black pepper or more, to taste Kosher salt
Melt half of the compound butter in a small saucepan. Pat the tenderloin dry with paper towels. Trim away excess fat. Slide the blade under the long silvery membrane (silverskin) and remove it. Fold about 6 inches of the thin flap end of the meat under the rest of the tenderloin to even the thickness of the roast.. Tie the tenderloin with kitchen string at 3-inch (8-cm) intervals. Rub the tenderloin all over with oil. Rub with pepper, pressing it into the meat, and season with salt. Use a meat injector to inject the melted compound butter all over in the meat. Rub the rest of the butter evenly over the roast.
Prepare charcoal for indirect grilling (bed of charcoal on one side). Grill the beef over the hottest part of the grill, turning it every few minutes so a slightly charred crust develops all over, 20 to 25 minutes. Move roast to cool side of the grill and cover. Use a remote meat thermometer set 20 120’F to tell you when the roast is done. Remove to a platter, and let rest for 20 minutes before carving. Serve with good dinner rolls to sop up any meat juices, and a macaroni salad, with grilled corn on the cob.
May your hot things be served hot, your cold things be served cold, and your Aged Ghouda be served at room temperature; There is no success outside of the home that justifies failure within the home. Seeeeeya Chief Longwind of the North
If you love his, share it with family, and friends:
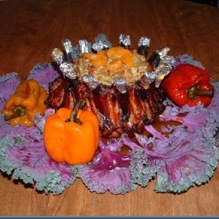
Doesn’t that look spectacular? It does to me. The surprise is that everything on it is easy to make, and deliscious. We have the crown prok roast on a bed of flowering kale, with some griled sweet peppers around it, a pineapple upside down cake that is so moist, light, and sumptuous, a yummy, and refreshing frujit salad, a veggie tray, a beautiful cole slaw, and homemade ranch dip, with a buit of fresh dill for the veggies. The hardest part of making this meal is grating the fresh cabbage, carrots, and mincing the onion for thr slaw.
What’s that Ted; you say you have teens in the house to do that. That’s the way to handle that chore!
So let’s break this into parts. First, the star of the show, the crown roast.
From my cookbook: You Can Be A Great Cook With Pork
Alright, you on the left, tell me how you’re going to cook this dish. Remember, this is an elegant one, so it must be done right. What’s that? You don’t have a clue? Yes you do. You just need a bit of coaching.
The crown rib roast is the best tasting, most succulent piece of pork I have ever cooked, or eaten. It is beautiful to the eye, and to the mouth. This roast is made from the pork loin with the ribs attached. The ends are frenched”, that is, the small chinr bones, and the meat between the bones are removed from the roast. That meat can then be used for sausage, or stuffing, or kabobs, etc. When purchasing the ribs, ask your butcher to leave the tenderloin attached. This will give you much more meat than ordinary baby-back ribs. Also, when the meat is formed into the classic Crown shape, the loin will act as a base to hold in the stuffing.
Most butchers will French the ribs for you upon request, though the butcher I went to didn’t. After I found out how easy the process was, I was glad he didn’t. I now have about three pounds of meat and bone with which to make a grand pot of baked beans, bean soup, and stir-fry (not all at once of course).
This roast is best when cooked in a smoky barbecue, though it is quite good roasted in the oven. Usually some kind of rub or marinade is used to treat and tenderize the meat starting the day before. Then while cooking, a glaze is brushed over the meat. The center is filled with fruits, farce meat, or stuffing after the crown roast is placed on the platter. Colorful vegetables placed around the roast complete the dish.
The following is just one way to prepare this elegant roast. You will undoubtedly find your own way to flavor your roast to perfection.
Ingredients:
Pork Loin Rack of Ribs Ribs with at least 16 bones. The chine bones should be removed, and the bones Frenched by your butcher. It will look like this:
3 cups Mandarin Orange slices
2 tsp. Salt
2 tsp. Black Pepper, coarse grind
2 cup Sugar, or Sweetener
2 cloves Garlic, minced
1 medium cooking Onion, diced
1 orange Bell Pepper
1 yellow Bell Pepper
1 Green Bell Pepper
2 whole Cooking Onions
1 cup Brown-Rice
2 cups Water
5 whole Carrots
1 cup cold Water
1 bucket of hardwood chunks )I prefer maple, alder, or fruit woods)
If the roast isn’t already prepped by your butcher, prepare the meat by laying the ribs on a wooden cutting board, with the meaty side down. Slice the meat from between the bones until reaching the thick loin muscle. Cut the small eye of meat from the bone top as well, and remove the chine bones. Turn the meat over and remove the strip of fat and connecting tissue lying over the top muscle. Then, fillet that muscle from the loin. You will end up with a long and slender muscle containing small bones. Trim the ends of the rib rack so that when it is stood and formed into the crown, the end ribs will be about 1/2 inch part. Reserve the trimmed meat, chine bones, and connecting tissue for later meals.
Place the rice and remaining water into a covered pot and bring to a boil. Turn the heat to simmer, add 1/3 tsp. salt, cover, and let cook for thirty minutes. When the rice is done, add a touch of garlic powder and the mandarin oranges. Dice one of the onions and mix into the rice. Cover refrigerate. This is your stuffing.
Mash two cups of oranges in a glass or stainless steel bowl. Add one cup of water, 1/2 cup sugar or sweetener, the garlic, diced onion, salt, water, and pepper. Put into a very large plastic bag along with the ribs. Remove all air so that the ribs are completely covered by the marinade. Place in the refrigerator.
Next day, remove the ribs from the marinade and place into a lightly greased, heavy, cast-iron frying pan with a metal handle. Pour the marinade into a 2 quart saucepan. Bring the marinade to a boil and set aside.
Fire up the grill for indirect heat. This is accomplished by dividingthe charcoal into two piles on opposite sides of your grill. Igniitr and let sit until the charcoal is red hot.
While the coals are heating, stand the ribs on end, meat side down, and form the rack into a circle with the curve of the bomes arching outward, and meat turned in. Tie the end bones together with butchers cotton string, and wrap the entire roast with a turn of string.
Put four or five chunks of hardwood on each charcoal pile. Put a disposable, alumonum loaf pan between the charcoal piles with two cups of water in it. Place the grill in place, and center the rib pan between the charcoal piles. Cover the grill and close the vents halfway and let cook for 1 hour.
Remove the lid and brush the roast with marinade. Put aluminum foil hats on the bone ends. Replace the lid and baste every fifteen minutes for the next half hour. Check the meat thermometer. When it reads 140′ F., remove and fill the inside with the rice/mandarin orange stuffing. Put the lid back on and cook for another twenty minutes, or until the temperature read in the thickest part of the meat reads 145’ F.. Remove from the grill, cover loosely with foil, and let rest 15 minutes before serving.
Brush all veggies , including the onions (peel them first), with cooking oil and lightly salt. Remove the barbecue lid and arrange the veggies around the fire. Add more wood if needed. Brush the roast with the cooked marinade sauce. Cover and cook for ten minutes more.
Remove the roast and place on a large platter. Let sit for fifteen minutes.
Wile the roast is resting, lightly grill the veggies. Place the colorful Veggies artistically around the roast and remove the string. Set a beautiful table and impress everyone with cloth napkins. Charge each member of your household $5 per plate and grin. You know your kidding. But do they? Muahahahaha.
Remove the veggies and place in a suitable bowl.
*
That;s all from my cookbook. Now, here is my juicy, refreshing, and tangy Cole Slaw Recipe. I’ve had people who said they pfrefer a creamy slaw tell me that after tasting this, they changed their favorit slaw; and it’s so simple to make.
Cheif Longwind’s Refreshing Slaw:
The dressing for this slaw is so simple, it looks like it shouldn’t work. But it does, and deliciously so.
1 medium head green cabbage, or 1/2 head green and 1/2 head purple cabbage 1/2 cup finely chopped onion 2 carrots, grated 3/4 cup salad dressing (not mayonnaise) 1/4 cup sugar 1/4 cup ice-water
Grate the cabbage into a large bowl. Add the onion, sugar, salad dressing and ice-water. Wash, then grate the carrot into the bowl. Stir until all ingredients are combined. Now comes the important part, taste your slaw. If its not wet enough, add a bit more water. The same is true for the other ingredients. The goal is to create a salad that is very moist, even wet, and refreshing. The onion adds loads of flavor, but if the chunks are too large, or there is too much onion, it can be overpowering. And remember, you can always add more of any ingredient. But once it’s in, it’s almost impossible to remove. So add a little, taste, and adjust.
This next salad is light and refreshing. It perfectly compliments the main course and is a great summer or springtime treat. It can even be used after dinner to “cleanse the palate”, leaving the mouth refreshed. And this one is full of delicious nutrition in its most natural form..
Chief’s Fruit Salas
Ingredients:
two freestone peaches or nectarines
2 cups fresh strawberries
2 apples
1 cup pitted cherries
2 tsp. lemon juice
1/2 cup water
1/2 cup sugar
Remove the pits from the peaches or nectarines and cut into eight equal wedges. Cut the wedges in half and place in a large glass or stainless steel bowl. Core the apples and cut into eight wedges, again cutting each wedge in half. Peel and slice the bananas, remove the hulls from the strawberries, and add these to the bowl with two tsp. of lemon juice. Stir to coat the fruit. Peel the oranges and divide into sections. Place into the bowl. Finally, add the water and sugar and toss all ingredients together. Refrigerate for at least an hour before serving.
Mary’s Pinapple Upside-down Cake
I didn’t create this recipe. It was given to me by my Mother-in-Law, the woman, who with my wife, taught me some pretty important basics some twenty years past. The cake is a wondrous thing. So with no further explanation required, I give you this sumptuous desert.
• 1 cube Margarine • 1 ½ cups Brown Sugar • 1 can Pineapple Rings • 1 Yellow Butter-Cake Mix • 1 cup Pecan Halves • 1 small jar Maraschino Cherries • 3 large Eggs • ½ cup Cooking Oil
Preheat the oven to 350 F. Melt the butter and pour into a 9 X 13 cake-pan. Sprinkle the brown sugar to completely cover the pan bottom (should be about ¼ thick). Place the Pineapple rings to cover the pan bottom without overlapping. Cut the cherries in half and distribute in the patches not covered by pineapple. Sprinkle the pecans evenly over the pineapple and cherries. Mix up the cake mix according to package directions and gently spoon into the pan so as not to disturb the fruit and nuts. Bake until a toothpick inserted into the cake center comes out clean when removed. When done, grab some hot-pads and remove the cake from the oven. Immediately run a knife around the cake edges. Turn onto a suitable serving tray by pressing the tray on top of the cake, then inverting everything. Carefully lift off the cake pan. Let cool and serve.
Finally, We will make our ranch dressing to go with your relish tray. It’s easy. And I’ve made a few tweaks to the original, just to add a little something extra.
Ingredients:
¼ cup Greek yogurt
3 tsp. Fresh chives, chopped fine
½ tsp. dried Dill
½ tsp. dried Parsley
½ tsp. Garlic Powder
½ tsp. Onion Powder
¼ tsp, Salt
⅛ tsp, pepper
¾ cup Buttermilk
½ tsp. Sriracha Sauce, or ¼ tsp. cayenne pepper 9optional)
Place buttermilk, then mayo into a medium glass, ceramic, or stainless steel bowl. Add the remaining ingredients. Whisk together until smooth and creamy. Chill until served.
The ranch dressing, salads, and cake can be made a day or two bwfore the meal.
Enjoy.
May your hot things be served hot, your cold things be served cold, and your Colby be served at room
temperature;
There is no success outside of the home that justifies failure within the home.
Seeeeeya Chief Longwind of the North
If you love his, share it with family, and friends:
Ladies and Gentleman. I present to you the pork cuts favored by both young and old, and short and tall, the sweet, succulent, stick between your teeth meat known around the world as ribs.
Pork ribs come from multiple sections of the carcass. The most tender and flavorful are the Baby Back Ribs. These come from the spine area.
Spare ribs are the longer, thicker ribs from the rib cage. They are delicious, but require more work to make them that way. Spare ribs are often braised before roasting or barbecuing.
Before we get into the ribs, let me give you my dry rub, and mop recipes.
What’s that Larry? What’s a mop?
Well, when we’re talking ribs, it isn’t something you use to clean floors with. It is a flavored basting liquid usedto add flavor, and keep the ribs moist, maybe create that wonderdful outer coating, called bark.
Here are the recipes.
A rub is a mixture of ingredients that is blended together and literally massaged onto the meat, which is then refrigerated for a few hours to let the flavorings permeate the pork. It is left on during the cooking process. Rubs can be either savory, sweet, and can contain some heat from peppers. Use rubs when you want intense flavor.
There are savory sauces, but most are usually sweet. The meat is basted during the cooking process with the sauce. Thin sauces are used for large pieces that require long cooking times. Thicker sauces are used on small, quick cooking cuts and are applied during the last few minutes of cooking.
There are as many recipes for pork rubs and sauces as there are people who cook. For that reason, we will explore a few basic recipes. Use instructions will be given with later recipes.
*
Rubs:
As stated above, rubs are broken into two basic categories, savory, and sweet. Savory flavors include pungent herbs, spices, and flavorings such as oregano, sage, coriander, cilantro, paprika, black pepper, and salt . Sweet rubs will contain ingredients like molasses, brown sugar, white sugar, sweet basil, sweet peppers, etc. Both usually incorporate universal flavors such as onion, and garlic.
There are no hard-fast rules to determine when you will use the savory rubs versus their sweet cousins. Just remember to balance the meal.
The first few rubs are savory. Care must be taken to control the salt flavor. They work as well when you are barbecuing with smoky hardwoods as with an oven-baked crown roast.
*
Italian Herb Rub
This rub can be used with pasta, or anti-pasta, and makes pork an ideal companion for Brochette. It can be used with chops, roasts, ribs, and steaks. Be careful with this though. The strong, pungent flavors can easily overpower the delicate pork. The idea is to enhance and compliment the meat, not replace it. In other works, a little goes a long way.
Ingredients:
1 tsp. dried Oregano
1 tsp. dried Basil
1/4 tsp. Rosemary
1/4 tsp. Powdered Thyme
1/4 tsp. Rubbed Sage
2 tbs. Coarse Black Pepper
1/2 tsp. Salt
1 dried Bay Leaf
1/3 tsp. dried Fennel
Place all ingredients into a suitable airtight container and shake vigorously. Store in a cool-dry place.
You may want to pulverize this mixture in a blender. But it’s not essential to do so.
*
Savory Rub
As its name implies, this rub will impart a savory flavor to the pork. So the pork should be served with sweet flavored vegetables or fruits to balance the plate. A classic example would be to serve savory pork ribs with applesauce and a European style salad. Enjoy.
Ingredients:
1/2 tsp. Rubbed Sage
2 tbs. Coarse Black Pepper
1/2 tsp. Powdered Thyme
1 tbs. Spanish Paprika
1 tsp. dried Parsley Flakes
1 tbs. Granulated Garlic Powder
1 tbs. Granulated Onion Powder
1/2 tsp. Salt
Place in an airtight container and shake vigorously. Store in cool-dry and dark place.
*
Mexican Rub
Ingredients:
OLE! This rub will allow pulled pork to be used in tacos, tamales, burritos, sopa, chili con carne, and with a host od other south American, and Southwestern recipes.
2 tbs. Spanish Paprika
1 tsp. Granulated Garlic
1 tsp. Granulated Onion Powder
1/2 tsp. Red Pepper (Cayenne Pepper)
1 tsp. Dried Parsley Flakes
3 fresh-chopped cilantro
1/4 tsp. Coriander
1 tsp. Salt
Place in an airtight container and shake vigorously. Store in a cool-dry place.
*
Oriental Essentials Rub
Pork is used in so many oriental dishes. Its sweet flavor compliments the colorful stir-fries and tempura dishes. This rub will help bring out the flavor of pork.
Ingredients:
1 tsp. Granulated Garlic Powder
1 tsp. Granulated Onion Powder
1/2 tsp. MSG (optional)
1/8 tsp. Chinese 5-Spice Powder
2 tbs. Dried Celery Leaves or tsp. Celery Seed
Combine in an airtight container, shake vigorously and store in a cool, dark place.
*
Deep South Nut Rub
Aw Nuts! I know, bad pun (heavy sigh). I just can’t help myself. To make it up to you, I give you my version of Deep South Nut Rub. And I’m not talking about a good back massage with peanut oil Hmmm. I wonder how that would feel. But then I’d smell like peanut butter. Guess I’d better put that idea to rest. But feel free to massage this nutty rub into your pork. Nuts and pork go surprisingly well together. And for a treat, substitute your favorite nuts for the ones in this recipe. You can change the oil to sesame, or walnut oil, replace the peanuts with crushed filberts, or Brazil nuts, or even macadamia nuts. Be creative. Your family will thank you. But please, hold the nut puns to a minimum. I’m enough of a nut for this world.
Ingredients:
1/8 tsp. Sesame Oil
1/4 cup finely chopped Peanuts
1 tsp. Salt
1 tsp. Coarse-Grind Black Pepper
1 tbs. Paprika
*
Mushroom Rub
Fungus, how I love fungus. I serve it with my pork, with my beef, in soups, stews, and chowders, or just plain, fried in a little butter. Oh, wait. I’m getting carried away. Mushrooms come in such a variety of textures and flavors, from the powerful flavor of morels, to the delicate chanterelle. But any way you use ‘em, I like ‘em. This rub uses mushrooms to add a touch of elegance to the pork, transforming the humble pig to an elegant meat, suitable for your mother-in-law.
Ingredients:
2 tbs. Dry Mushroom Powder (or dry your mushrooms in a warm-not-hot oven and then put in blender)
1 tbs. Granulated Garlic Powder
1 tsp. Granulated Onion Powder
1 tsp. Salt
2 tsp. Black Pepper
Place in an airtight container, shake vigorously, and store in a cool-dark place.
My Favorite Rub
Ingredients:
1 cup dark brown sugar
2 tbs granulated onion powder
2 tbs. Granulayed Garlic powder
2 tbs smokedpaprika
1 tbs. Salt
2 tsp. Cayenne pepper
3 tbs. Chili powder
Mix all ingredients in a bowl, use on ribs, pork roasts, in the oven, in the slow cooker, on the smoker, or enven on the barbecue. This run is even great mixed ion with pulled pork.
*
Sauces
Like rubs, sauces are used to add flavor and improve the meat quality. But unlike rubs, you can marinate and baste with the sauces over time to create a rich flavor that completely permeates the meat. Combine those flavors with that of the smoke and you have created a thing of beauty. Enjoy.
*
Smokey Barbecue Sauce
This sauce is classic. It’s the basic idea used throughout the South and at all barbecue cook-offs. Just remember, the basic recipe is just that, a basic recipe. Every barbecuer worth his salt will have his or her own secret variant on this theme. You can add peppers, vinegar, herbs & spices, wines, whatever you want. These can be wet or dry rubs. The choice is totally yours.
A word of caution is in order here. Most barbecue sauces and rubs contain a fair amount of sugar. That means it will burn easily. So when you are using a barbecue sauce, don’t add it until the last few minutes of cooking time.
If you water down the sauce, and cook slowly over a slow fire, you can marinate the meat with it before cooking, then baste with it every fifteen to twenty minutes. But any way you use it, it will make your pork taste great.
Ingredients:
1/2 cup Dark-Brown Sugar
1/4 tsp. Mesquite or Hickory Liquid Smoke Flavoring
1 cup tomato Sauce
2 tbs. Worcestershire Sauce
1/4 tsp. Mustard Powder
2 tsp. Granulated Onion Powder
1/4 tsp. Granulated Garlic Powder
1/4 tsp. Black Pepper
1/2 green Bell Pepper, chopped
Combine all ingredients in a saucepan. Heat while stirring until the Peppers are soft. Pour the cooked contents into a blender and liquefy for 15 seconds. Pour into a suitable container and refrigerate.
If using as a marinade, and/or basting sauce, thin to the consistency of vegetable soup. Use as needed.
For those persons who need to limit their carbohydrate (sugar) intake, replace the brown sugar with 1/4 cup Splenda and tsp. Black strap molasses.
*
The Mop
Ok Kids, this sauce is possibly the most important one in the book. Learn to use it. And now, a few words about the mop.
A mop is a watery sauce, usually containing vinegar, some type of sugar or sweetener, a bit of tomato, all combined with herbs and spices. it’s used to marinate meat cooked slowly in the oven, or on the barbecue. It doesn’t add moisture but helps the meat retain it. And it adds great flavor by creating a thin glaze on the meat surface.
The following recipe is basic. Feel free to alter it to your taste. Just remember, this is your recipe. You can do with it whatever you want. Just understand that you will create some great, and some terrible tasting variations as you experiment. So I recommend that you experiment with small samples before using your creations on a large hunk of expensive meat.
One more thing, this mop is best when used with pork or chicken. For a good beef variety, omit the chile powder and replace with ginger and Soy Sauce.
Ingredients:
1/2 cup brown sugar, or 1/2 cup Sweetener + 1 tsp. Molasses
2 cups water
2 tbs. Granulated Onion Powder
2 tsp. Granulated Garlic Powder
1 tsp. Salt
1 tbs. Chile Powder
1 tbs. Clover Honey
1/4 cup White or Apple-Cider Vinegar
Mix all ingredients together. Heat while stirring until the mop begins to boil. Remove from heat and pour into a suitable wide bowl.
A small string mop can be purchased to apply this flavorful liquid to barbecuing meat. However, you can make your own with clean-white cotton material. Simply cut it into strips and fasten it to the end of a wooden handle. Or, you can use a new, washed sponge applicator.
*
Glazes
Glazes, like rubs, are applied to pork to enhance the natural flavor of the dish. But a glaze is brushed on while the meat is cooking. But unlike a rub, glazes usually contain sugar. The sugar caramelizes on the meat surface, creating a flavorful crust that seals in the meat juices. Glazes are usually applied to roasts, ribs, and hams rather than chops or steaks. Enjoy these tasty recipes and add one more skill to your culinary repertoire.
*
Smokey Apple Glaze
Do you know the difference between apple cider and apple juice? It’s simply that apple cider includes the pulp, skin, and everything else from the apple, minus of coarse the core and seeds. Apple juice is filtered until clear. That’s it.
Everyone knows how well apples and pork go with each other. This glaze is made from apple cider, smoke flavoring, and spices. It will take an ordinary pork roast and boost the flavor to new heights. And since I’m a relatively short guy, I’ll take all the height I can get.
Ingredients:
2 cups unfiltered apple cider.
1/4 tsp. Mesquite flavored Liquid Smoke flavoring
1 tsp. Finely Ground Black Pepper
1 tsp. Salt
This one’s easy. Just mix the above ingredients and use either as a marinade, or basting liquid.
*
Honey-Ginger Sauce
This sauce is at home both on the grill, and in the oven. It will give your pork a decidedly oriental flair. So break out the chopsticks folks.
Ingredients:
1/4 cup Clover Honey
1/4 tsp. Ginger Powder, or tsp. freshly grated Ginger
1 cup hot Water
A tiny pinch Chinese 5-Spice Powder
2 tbs. Lite Soy Sauce
Combine all ingredients together. Use as a basting liquid.
*
Pineapple Glaze
We now travel from the orient to the Pacific Tropics where we will enjoy the refreshing flavor of Pineapple. Like apple, pineapple is famous for its ability to elevate pork from the ordinary to the extraordinary. You’ll like this one.
Ingredients:
12 oz. can Crushed Pineapple
1 clove Garlic, minced
1/2 medium onion, minced
1/8 tsp. Powdered Ginger
1/4 tsp. Salt
1/4 tsp. Black Pepper
2 cups Dark-Brown Sugar
2 cups water
Combine all ingredients in a blender. Blend on highest setting until liquefied. Pour into a suitable saucepan and bring to a boil. Remove from heat and transfer to an airtight container. Refrigerate.
Use this as a glaze when roasting or barbecuing pork. Or spoon it over the top of cooked pork chops.
On to the Ribs!
Country-Style ribs are meatier than their cousins. Care is required in choosing them to avoid too much connecting tissue and gristle. Surprisingly, they are harvested from the pork shoulder. They are very tasty as well.
Like all pork, the rib meat is slightly sweet and works well with fruity, savory, or tangy flavorings. You can eat them straight-up with a bit of salt and pepper, or with every kind of coating from cinnamon-spiced apple sauce, to tangy tomato-based barbecue sauce, to Pineapple Sweet and Sour sauce. You can cook them with fresh fruit, or flaked coconut, or mushrooms and gravy, or… You get the idea. So, we will now explore the cooking techniques.
The following recipes will give you basic cooking techniques from which you can leap into the world of ribs. Enjoy.
*
Braised Country Style Spare Ribs I
This is the method by which you will most easily create ribs that are both succulent and full of flavor. From it, we will expand to more complex techniques and add new layers of flavor. But Don’t be alarmed. You aren’t getting a wimpy recipe here. These are fit for every occasion from a back yard picnic, to a hundred dollar a plate extravaganza. It’s all in how you present it. So cook em up, eat em up, and lick them fingers clean (sorry about the poor language used, but I have to make it sound authentic).
Ingredients:
2 lb. Semi-Boneless Country Style Spare Ribs
2 tbs. Salt
1 tbs. Cracked Black Pepper
1 medium Onion, quartered
tsp. Rubbed Sage
2 tbs. Cooking Oil
Water
Braising is accomplished by quickly searing meat, then simmering it in liquid. It can be done in a slow cooker, an oven, or on the stovetop. The only difference is the heat source. For convenience, the oven or slow cooker is normally used.
If baking, preheat the oven to 300′ F. Heat the oil in a heavy frying pan. When the oil is fragrant, turn the heat to high and sear the ribs on every side until lightly browned. Turn off the heat.
Place the ribs into a lightly greased covered roasting pan, or casserole dish. Add 2 cups of water and the remaining ingredients. Place in the oven and cook for 4 to 5 hours. Check the water level every hour or so and add more water as necessary.
If using a slow cooker, transfer the ribs to the appliance and add enough water to cover. Add the remaining ingredients, cover, turn on to low setting and go about your business for the day. Upon returning home after 4 or 5 hours, make the rest of the meal.
You can achieve the same results by simmering the seared ribs in a Dutch oven on top of the stove. But you will need to watch the water level more closely to prevent burning the ribs.
All of the above methods will give you incredibly tender ribs. Enjoy.
*
Country Style Braised Ribs II
Many years ago, my wife introduced me to Country Style Spare Ribs. They have much more meat than the back ribs. Unfortunately, if you’re not careful, they can be rather fatty. For that reason, we have stayed away from them.
Now you may ask; Why would this yo-yo be giving me a recipe he won’t use?” The answer is simple. Pork has changed. The animal is bred to be lean. I can almost always find high quality country style ribs with little bone or fat. These ribs can be made in countless varieties, from steamed with sour kraut, to smoked in a smokehouse. This recipe was, as usual, an experiment. I have often used sage and/or thyme as a seasoning with pork. But I wanted to try something a bit different. I changed the spices and the method of cooking, and came up with a winner that everybody raved about.
What made this recipe work was adherence to the basics. I cooked the ribs in slow, moist heat, which not only cooked the meat to the proper temperature, but allowed the seasonings to flavor the meat. I used cast iron, which browns meat wonderfully, even over low to medium heat. Finally, a good nose for herbs and spices helps, and that nose can only be gotten with experience, or a good cookbook.
So go ahead and cook up some ribs for your own applause, not to mention your taste buds.
Ingredients:
1 very meaty lean country style pork spare rib, with little bone, per person unless your crew is really hungry. Then make it 2 per person.
3 tbs. Extra-Virgin Olive Oil
1 tsp. Dried Oregano
1 tsp. Dried Sweet Basil
1 tsp. Granulated Garlic Powder
1 tsp. Granulated Onion Power
3 tbs. plus 1 tsp. Salt
1 cup water
Stab the rib meat thoroughly with a fork. Mix three tbs. of salt with the water and place in a watertight container. Add the ribs and let sit in the refrigerator for a minimum of three hours.
When ready to cook, heat the olive oil in a 10″ cast iron pan, or stainless steel frying pan if you don’t own cast iron. Place 4 ribs into the pan. Mix all the spices and remaining tsp. of salt together in a shaker. Shake the spice mixture over the meat. Cover and cook over medium-low heat for 10 minutes. During this time, prepare whatever else you will be serving.
Remove the lid and turn the ribs. Cook for an additional 10 minutes. Remove to a 150′ oven to keep warm while you repeat the process for the remaining ribs. Or, if you’re really good, get a couple of pans going with the ribs at the same time. When all the ribs are browned, place in a pot and add water until 2 inches deep. Cover and simmer over very low heat for another hour. Remove the ribs and serve with pasta.
Pork ribs come in various cuts, from the meaty Country Style Spare Ribs, to the ever-popular Baby Back Ribs. Get your hands an a butcher’s pork carcass chart to find where they come from.
The baby back ribs are among the most flavorful and tender part of the porker. And as with all ribs, half the fun is making a mess of your hands and face while trying to gnaw every scrap of meat from the bones.
Of course there are those dainty types who seem never to spill food on their shirt-fronts, an admirable skill, but I’m not one of them. Somehow, no matter how carefully I eat ribs, you
can see the results on my shirt. That really doesn’t matter. The extra laundry is worth the eating experience.
This chapter will present various techniques for preparing the different kinds of ribs. We will explore braising, roasting, baking, the barbecue, and the use of various rubs, marinades, and sauces. You will find that ribs are so much more versatile than we are led to believe by the media. So get the pots and pans ready. We’re gonna learn the in’s and out’s of ribs.
*
Broiled Country Style Spare Ribs
Broiled. You’ve heard the term used with countless products. But what does it mean? Broiling is a technique where heat is transferred to food through radiant, or infrared energy, usually from above. The food is placed inches from the heat source and cooked quickly.
The advantage of broiling is that due to the design of the broiling pan, fats drain away from the food while it is cooking. Also, the heat is intense, which helps seal in juices. The result is flavorful, lean, and juicy food, with more of its natural flavor intact. Broiling also adds appeal by browning, through a process called, the Mallard reaction.
Many foods are baked, steamed, or braised, then put under the broiler to finish the cooking process. That’s pretty much what we’re going to do with the ribs.
Now if you really think about what’s going on, broiling is really just like grilling over charcoal or gas, but without the smoke. So the same rules apply. Also, most home broilers can’t come close to the temperatures created in a good grill. Even so, sugary sauces like barbecue sauce, or sweet & sour sauce, will scorch easily under the broiler. So we will add sauce during the final two to three minutes of cooking time.
Caution: Eating well-prepared ribs may change your complexion and reduce your ability to handle delicate instruments. So I recommend that all plastic surgeons clean the sauce from their faces and hands before lifting a scalpel. Professional clothing models should also clean any sauce from their clothes and skin before entering the runway. Ribs can be messy!
Ingredients:
4 lb. Spare Ribs
2 tbs. Salt
1 tbs. Cracked Black Pepper
1 medium Onion, quartered
tsp. Rubbed Sage
3 tbs. Chili Powdered
3/4 cup dark brown sugar
2 tbs. Cooking Oil
Water
You will find a membrane on one side of the ribs. This is called silver skin, and must be removed. If not, the seasonings won’t penetrate the meat on that side.
Turn you slow cooker to high.
Combine the seasonings, and brown sugar in a bowl. Lift one corner of the silver skin away from the meat and bones. Grasp the membrane with a paper towel, as it is qute slippery, and remove it from the ribs.
Rub both sides of the of the ribs with the seasoning mixture, massaging it all over. P;ace your ribs into your slow cooker, and covr. Simmer the meat for two hours. Turn the slow cooker to its medium setting. Continue cooking for another three hours.
Prepare the accompanying dishes during this time.
When the three hours is up, remove the ribs to a broiling pan and Sppon sauce fro the slow cooker over the meaty side. Place two inches from the pre-heated broiler. Cook an additional 5 minutes. Optionally, brush with your favorite barbecue sauce and return to broiler for another two minutes. Plate and serve.
*
Barbecued Country Style Spare Ribs
Everybody knows and loves Ribs. Visions of long, slender bones, with meat nestled between, swimming in a rich barbecue sauce get the mouth watering. But I always thought it a royal pain that there is so much bone and so little meat on ribs. So when I was first introduced to Country-style ribs, I fell in love.
Country Style ribs are slender meaty chunks of tender pork with little bone. The flavor and texture is very similar to that of their bony cousins. Also, country style ribs aren’t as widely
known, which makes them less popular, and cheaper. What more can you ask for?
As with all pork ribs, the meat benefits from slow, moist cooking methods. So, we are going to explore yet another cooking technique, the dry rub.
What, dry rub? That doesn’t sound very moist. But don’t get confused. The rub is used to help tenderize and flavor the meat prior to cooking. We will also make a flavorful sauce that will keep the ribs moist.
Plan ahead for this cooking method. You will need several hours for the rub to do its magic, several more hours of cooking time, and a good barbecue grill. A small cotton mop or pastry brush will be used to baste the ribs as they cook. So let’s get to it.
Ingredients:
1 recipe Dry Rub (see Sauces & Rubs Chapter)
1 recipe Barbecue Sauce, thinned for basting (See Sauces & Rubs Chapter)
3 lbs. Country Style Ribs
1 medium Onion, chopped
1 tsp. Hot Sauce (your favorite brand)
Select quality ribs with little fat and connecting tissue. Pour the barbecue sauce into a marinating container, or zipper- type freezer bag and add the ribs. Remove as much air as practical from the container and jostle around until the ribs are completely covered. Place in the refrigerator and let rest for four hours minimum, or overnight.
Remove the ribs from the icebox and prepare a divided bed of coals in the grill. Ignite the charcoal and go about your other meal tasks until the coals are glowing. Place a disposable aluminum bread pan (drip pan) between the beds and install the metal grid. Add a cup or so of water to the drip pan.
Place the ribs over the drip pan and cover your charcoal grill. Adjust all vents 3/4 closed. Cook for four hours, basting every fifteen tp twenty minutes. Then, remove from the barbecue and serve with three-bean salad, smashed spuds, or whatever you want for side dishes. Provide napkins. Your guests will thank you.
*
Baked Country Style Spare Ribs
This is the same recipe as above except that you are going to cook these ribs in a covered roasting pan at low oven temperatures.
Ingredients:
1 recipe Dry Rub (see Sauces & Rubs Chapter)
1 recipe Barbecue Sauce, thinned for basting (See Sauces & Rubs Chapter)
3 lbs. Country Style Ribs
1 medium Onion, chopped
1 tsp. Hot Sauce (your favorite brand)
Select quality ribs with little fat and connecting tissue. Pour the barbecue sauce into a marinating container, or zipper- type freezer bag and add the ribs. Remove as much air as practical from the container and jostle around until the ribs are completely covered. Place in the refrigerator and let rest for four hours minimum, or overnight.
Preheat the oven to 250′ F. Place the ribs on a rack, situated in a covered roasting pan. Add 1 cup of water to the pan. Sprinkle the chopped onions evenly over the ribs. Cover
and place the pan into the oven. Baste with sauce every half-hour for four hours. Serve immediately.
*
Barbecued Country Style Spare Ribs
“Hey mom, can I have some more ribs?”
You look at your son’s face, covered with gooey barbecue sauce, along with the front of his shirt. You lick your own fingers after taking that last bit of meat from a rib bone with your teeth. And you say “You must really like those ribs. You’ve eaten three helpings.”
“I’m just a growin’ boy Mom.” he says as he happily accepts the platter from your hand. You watch with satisfaction as he, and the rest of your family devour the food you prepared to perfection.
And so the story goes all over this nation. Moms or Dads, or both, grilling barbecued ribs for a grateful family, creating a true American classic.
Of course, if you have the right equipment, and about six or so hours of time, you can make perfect ribs every time.
Unfortunately, most of us have an hour or so to prepare whatever it is we want to eat. With that in mind, this recipe will use two cooking methods to create this memorable main course; braising; and barbecuing.
Here’s how it works. We will braise the ribs in a slow cooker during a normal working day, allowing them to get so tender and good, and to absorb some gentle spices. Then, a half-hour before its time to eat, we will fire up the grill and finish the meat. Are you ready? Then let’s get cooking.
Hardwood chunks (I like fruit woods, or maple, alder, or birch).
Place the ribs into the slow cooker along with enough water to just cover the meat. Add the remaining ingredients, except the barbecue sauce. Cover and turn the slow cooker to its lowest cooking temperature, but not to warm as that won’t produce enough heat to actually cook the meat. Go to work.
When you get home, prepare whatever else you want. May I suggest some sweet potatoes, and a leafy salad with a good raspberry vinaigrette? Make a divided bed of charcoal for indirect heat. Fire up the grill.
When the charcoal is very hot, add the hardwood chunks to the fire. Place a drip pan made from aluminum foil between the two banks of hot coals. Add a cup of water to the drip pan. Place the cooking grate over the fire and place the ribs above the drip pan.
Cover the grill and adjust all dampers to the half-closed position. Cook the ribs for ten minutes, turn, and cook an additional five minutes.
Finally, brush the ribs with your favorite barbecue sauce and cover. Cook five more minutes, remove to a platter, and serve.
*
Oven Roasted Baby Back Ribs
This recipe calls for slow and low cooking temperatures with hours of time. The low temperatures can be achieved by cooking in either a covered roasting pan in the oven, in a covered slow cooker, in a Dutch oven at the campground, or on a charcoal barbecue. The key is controlling the temperature.
Ingredients:
4-lbs. baby back pork ribs
1 cup of your favorite barbecue sauce
1 tsp. salt
2 tbs. coarsely ground black pepper
1 cup water
1 cup apple-cider vinegar.
Shaker of your favorite dry rub.
Favorite Barbecue Sauce (to be used as a condiment).
Preheat the oven to 400 degrees F. Or, make two piles of charcoal on opposite sides of a covered kettle barbecue. Soak the charcoal used cooking oil, and ignite. Place an aluminum drip pan between the piles when the charcoal is hot. Or, half fill your fire pit with charcoal briquettes. Ignite.
While the charcoal is getting hot, dip the ribs in a mixture of 1 part vinegar to 1 part water. Sprinkle the dry rub generously over the ribs, both sides. If cooking in the oven, place the ribs bone side down onto a raised rack in a suitable roasting pan. Place another ovenproof dish filled with 2 cups of water into the oven. Turn the oven temperature down to 3050’F. When the barbecue, or fire pit is hot, place the ribs bone-side down over the fire, cover, and close the vents to the half-open position. Cook for three hours, brushing the meat with water every 30 minutes. Meat is cooked sufficiently when the meat is easily removed from the bone.
When the proper time has elapsed, remove the cooked ribs and slather a generous amount of the barbecue sauce onto the meat. Slice between the bones and serve with fresh veggies, something cold to drink, and a good joke or two.
Though the above recipes are from another of my cookbooks, and are really good recipes. tnis last one one over guests visiting from the Carolinas, where a vinegar based mop is king. It is my best recipe for BBQ spare ribs. I have to warn you, these ribs will have your family, and freinds asking you ot make them over, and over again. Enjoy.
A perennial favorite for this holiday is succulent, smoky spare ribs. Though the baby-back ribs are all the rage these days, meaty spare ribs are less expensive, and have more meat on them. When treated properly, in my humble opinion, they beat baby-back ribs for flavor and texture any day of the week.
As every barbecue pit master will tell you, phenomenal ribs take a day’s worth of loving care in a smoker that will cost you a month’s salary, with three hundred pounds of hardwood fuel, right. Wrong. I’m giving you a recipe that will produce fall-off-the-bone tender, juicy, and succulent ribs that require a night in the fridge and 40 minutes in a covered kettle or gas barbecue, and a few sticks picked up from the woods, or a bag of cheap hickory chunks that can be had at the supermarket.
Here’s how I did them two days ago, to rave reviews from guests and family alike (I was told by one guest that these were the only ribs she’d ever had that required no sauce, and by my wife that they were the best ribs she’d ever eaten). Best of all, these are easy to make, and inexpensive. Now what more can a guy ask for?
Bob Flowers’ Smoky Spare Ribs
Ingredients:
2 racks pork spare ribs
3 tbs. salt
4 tbs. mild chili powder
1 cup dark brown sugar
1 tbs. granulated garlic powder
2 tbs. granulated onion powder
1 tbs. rubbed sage
Wood chunks/branches cut into 6-inch lengths, maple, hickory, mesquite, cherry, or tag-alder wood.
Combine the salt, chili powder, brown sugar, garlic, onion, and sage in a bowl and blend together until evenly mixed. Lay out the ribs on a covered working surface. Rub both sides of the ribs, massaging the seasoning mixture into the meat. Place in a suitably sized plastic bag, and seal. Refrigerate overnight.
To cook, place the ribs into a large roasting pan, cover and place into a 200 degree oven for eight hours; or, place into and electric turkey roaster, set for 200 degrees, and let it hang out for eight hours or so. An hour before serving time, fire up the barbecue and let it heat up for 15 minutes. Place the wood on top of the charcoal, or wrap in heavy duty foil and put on the fire in a gas grill, and place the ribs on the grill. Cover and reduce heat by either closing all vents by half on the charcoal grill, or at lowest setting on the gas grill. Let the ribs cook in the smoke for 45 minutes. Remove and serve with your favorite barbecue sauce, grilled corn, and a good slaw.
.May your hot things be hot, your cold things be cold, and your cheddar be served at room temperature.
“No success outside the home can compensate for failure within the home.”
From the Kitchen of Chief Longwind of the North
SHARE THIS:
If you love his, share it with family, and friends:
This recipe is an adaptation of my Chicken & Corn Chowder recipe, from my Cookbook – You Can Be A great Cook With Soups, Stews, and Chowders. If you are interested in any of my cookbooks, email me for prices. The titles are as follows:
You Can be A Great Cook With Beef
You Can Be A Great Cook With Poultry
You Can Be A Great Cook with Pork
You Can Be A Great Cook With Soups, Stews and Chowders
What makes a chowder? Well Frank, I’m glads you asked.
Chowders are unusually creamy ,with rich flavor, and large chunks of meat and veggies, similar to a stew. In the Eastern U.S. they usually contain clams, crab, lobster, or fish. If shrimp are used, it’s called a bisque.
Timothy, you have a question? Why is it called a bisque when shrimp is the protien? Well, I don’t know, other than bisque was created in France, and that’s what they were called.
In the Southwest, sausage and pork are the norm, usually with corn added. In the North, it’s all about the hominy and pork. Chowders are always served hot.
Where I grew up, a large number of people who share my ancestral heritage (at least the Native American part of it), love this dish called corn soup. And I have to agree, it’s pretty good stuff. In fact, it’s downright delicious. We’re going to take that same soup, and modify it into a chowder. In the process, we are also going to add a distinctly Southwestern flavor, and substitute chicken for pork, though this chowder would be equally good with pork as well.
When it’s all done, I have to suggest serving it steaming hot with fresh cornbread, butter, and honey. Tell me when you’re going to make this so I can come over. Yum.
This chowder is a delicious combination of meat , and chunky vegetables, hominy, onion, Sage, corn and a silky, rich sauce.
Because we will be adding potatoes to this chowder, we have to prepare them a few hours before we start making the recipe, to make them safe to eat.
Ingredients:
3 bone;rss Chicken Breasts
2 cups Chicken Stock
4 slices side pork, or ½ pound uncured pork belly
½ lb. chorizo
1 medium onion, chopped
2 cloves Fresh Garlic, peeled and sliced paper thin
1 tsp. Salt
2 Yukon Gold potatoes
2 cups corn kernels, drained
1 cup hominy, drained
1cup milk
½ cup heavy cream
½ cup Celery Root, diced
3 Carrots, sliced
1 tsp. Kosher salt
1 tsp. Black Pepper
1/4 tsp. Cayenne Pepper (optional)
2 tbs. Chili powder
½ tsp. Ground cumin
1/8 tsp. Colgin’s Liquid Smoke, Mesquite Flavored
2 tbs. Sunflower Oil
Roux:
3 tbs. All purpose flour
3 tbs. butter
Peel the potatoes and cut into small chunks. Place in cold water, cover, and let sit for two hours. This will leach out potassium one of substances that damaged kidneys can’t process properly.
Now it’s time to make the chowder!
Bring 3 cups of water to a boil over medium-high heat. Drain, then add the potatoes. Set a timer for twenty minutes.
Dice the chicken, and pork into ½ inch chunks. Heat the oil in a 3 quart saucepan. Add the pork, and fry until crisp, turning half way through the cooking time. Remove to a paper-towel lined plate to drain. Next, in the same pan, lightly brown the chicken. Set aside with the pork, Finally, brown the chorizo, drain, and set aside.
Place the chopped onion and garlic. Stir and cook until just starting to soften.. Add ¼ cup of the chicken stock and scrape the pot bottom to loosen any bits (degaze the pan). This liquid will be added to the chowder to add flavor.
Place 2 cups of the corn kernels into a blender and blend until smooth. We will use this, and the roux add flavor, and to thicken the chowder.
When the potatoes have cooked for the twenty minutes, drain them, and put back into the cooking pot. Add the remaining stock, and the deg lazing liquid and bring to a simmer over low heat. Put all of the ingredients into the pot. Cover, and simmer for 45 minutes to blend the flavors.
In the skillet used to brown the meat, melt the butter. Add the flour, and cook over medium heat, stirring until the roux just starts to brow. This is called a blonde roux. Slowly stir in the milk. Everything will get thick, and pasty at first, Nut as you keep adding milk, and stirring, you will get a silky-smooth sauce. Stir in the cream to add richness. Finally, add your cream sauce to the chowder, stirring to incorporate it fully.
You want the chowder to be thick enough to coat a spoon, but not so thick as to be like a thin paste. If it isn’t as thick as you want, make more roux, and thin with the chowder broth. Add it back into the chowder.
Serve with cornbread, and honey. For desert, might I suggest fresh strawberries?
May your hot things be hot, your cold things be cold, and your cheddar be served at room temperature.
“No success outside the home can compensate for failure within the home.”
From the Kitchen of Chief Longwind of the North
If you love his, share it with family, and friends:
Ah Shredded Beef. You’ve heard of it, and maybe even had it in a taco or burrito. If you have, then you know how wonderful it tastes; plus, it’s a great way to take a tough cut of meat and turn it into something tender, juicy, and delicious.
For today’s lesson, I’m giving you a great recipe , with cooking techniques for making this iconic dish. Plus, we’re going to explore how this tasty meat can be used, besides in tacos, and burritos.
What’s that Angela; why mess with a good thing? Tacos and burritos are great.
On that, I’ll just say, why limit yourself? Shredded beef can be used to make some truly wonderful meals.
The beef cut used can be a chuck roast, brisket, top sirloin, flank, any cut that has good marbling, and preferably, a fat cap. If there is a lot of connecting tissue, don’t worry; it will melt away, as it is made of collagen. It will just improve the mouthfeel. So let’s get started.
Yes Jim. Aren’t those cuts kind of tough? Why yes they can be, which is why shredded beef was probably created, to make the meat tender, and juicy, with good flavor. For this recipe, we are going to use a chuck roast. It is made from the front shoulder, which is a well exercised muscle, and so has great flavor.
Tools Needed: large forks, covered roasting pan, or dutch oven, measuring spoons, liquid measuring cups, oven, heavy frying pan.
Recipe:
3 lb. Chuck roasting
1 tbs. Kosher salt
2 tsp. Coriander seeds
t tsp. Ground cumin
1 medium onion
3 cloves fresh garlic
4 tbs. cooking oil
Preheat oven to 290’ F.
Peel and roughly chop both the onion, and garlic. Heat 2 tbs. Of the cooking oil in the heavy pan, until it begins to shimmer. Rob the salt all over the meat; then place it into the hot pan. Fry for three minutes on each side to brown the roast. Turn off the stove top burner. Add the remaining oil to your roaster/dutch oven. Transfer the roast into the baking vessel. Sprinkle the herbs and spices over the meat. Add the onion and garlic. Cover, and place into your oven, Set a timer for four hours, and walk away.
When the timer goes off, remove the roaster from the oven. Let cool for 20 minutes. Now is the time to chop peppers, and onion, soften the tortillas in a little hot oil, and shred the lettuce for your tacos, or burritos. NO avocado, Not allowed Have condiments ready, such as sour cream, your favorite hot sauce, Lime, etc.
When the twenty minutes has elapsed, the roast should be cool enough to work with. Take your two, large forks, and scrape the meat on the sides of the roast, to shred it into strings of meat. Save the juice fro the roast. It can be used later.
Stir the onion, and garlic into the shredded meat. It’s now ready to be used in your tacos and burritos.
Keep the shredded beef warm. Put the lid back onto the roaster to keep it from drying out, until. your meal is complete. Place remaining meat into a sealed container, along with the saved juice, and refrigerate.
The leftovers, those wonderful leftovers. From a three pound roast, you should have some leftovers. What can be done with them; make more tacos? Nah, that would be boring. Here’s an idea, let’s turn it into beef and gravy, to serve over cooked rice. Throw in a fresh, hot cob of corn, or some glazed carrots, and you have another meal.
Ingredients:
1 cup Shredded beef, with juice
1 tbs. Corn starch
¼ cup water
Heat covered sauce pot over medium heat. Put the shredded beef into the sauce pan and cover. Cook for five minutes and stir. If the mixture is boiling, in a small bowl, mix together the corn starch and water. Stir until smooth. Add it into the pot and stir to forms a rich mixture of beef and gravy. Serve over cooked rice.
Still have leftover shredded beef? Make it into a sandwich. Here’s one that I made, and it was great. Mind you, I used up my daily allowance of dairy with the cheese added.
Heat a heavy pan, or griddle over medium heat. Brush two pieces of rye bread with extra virgin olive oil. Place two slices of either Swiss, or American cheese on one slice. Heat up the meat in your microwave until it’s steaming hot, about 1 minute of time. Place a generous helping of meat on top of the cheese. Cover with the other bread slice, both slices with the oiled side on the outside. Place Into the pan and cook like you were making a grilled cheese sandwich. that was a tasty lunch.
Enchilada Pie
For this one, we will be using the shredded beef as part of the filling for this delectable dish. You will need a casserole dish, or square cake pan.
Ingredients:
12 corn tortillas
1 cup shredded beef
4 oz. Can ripe black olives
½ onion, peeled and sliced
1 red bell pepper, seeded, and chopped
12 oz. Enchilada sauce
1 cup shredded cheddar cheese
Preheat oven to 350’ F.
Spread about three tbs. Of the sauce over the bottom of the baking dish/pan. Lightly brush oil on the tortillas, and place one layer to cover the pan bottom. Spread layers of beef, onions, peppers. Black olives, sauce, and cheese, like you were building a lasagna. Top with a second layer of tortillas, leaving a couple tbs. of sauce, and enough cheese to top the final layer of tortillas.
Top with your final layer of tortillas, an top with sauce, and finally, cheese. Cover pan tightly with foil. Bake for thirty minutes. Remove the foil, and bake five minutes more. Serve with a good salsa, or steamed veggies.
And that kids, are just a few things you can d with shredded beef. Try it in other thinks, like a taco salad, or served over crispy onion rings. Maybe kick it up with some Sriracha, or Tabasco sauce, and serve it over Spanish rice. Serve it on crackers, with cheese, as part of a lunch plate, or to be eaten while watching the game. Just make up some shredded beef; then decide how you are going to use it. You won’t be disappointed. Enjoy.
May your hot things be hot, your cold things be cold, and your cheddar be served at room temperature.
“No success outside the home can compensate for failure within the home.”
From the Kitchen of Chief Longwind of the North
If you love his, share it with family, and friends:
Today, we are going to eat old school, literally. If you are like me, way back when school hot lunches were made at the school, fresh, and if your cooks were like ours, very good quality, there is probably a soft spot in your heart (or around your middle) for sloppy joes, those wonderful portions of ground beef, swimming in a sweet , slightly sour, well spiced tomato sauce, all between the two halves of freshly made hamburger buns. I’m not going to give a recipe for bread dough from which to make the buns, as that was done in Lesson52, Man Does Not Live By Bread Alone, But He Might Want To. Instead, we will learn how to make a very tasty sloppy joe filling. Anyone Hungry?
So first, we need ground beef. Ozzie, you ask, What’s the best kind of ground beef?
The answer to that is very subjective. g/round beef can be made from sirloin, the top, or bottom round, brisket, or chuck. You will find labels such as all natural, grass fed, Pure Angus, and
lean to fat ratios from 90/10, to 70/30, with the first being the most lean, and the lat being the most fatty. Lean meat means you get more meat for each portion, as a lot of the fat melts out from cooking beef. But lean meat can easily be overcooked, dry, and tough. It also won’t hold together well in burgers, meatloaf, or meatballs. 89/20 beef is a better choice, as it has just enough fat to make it juicy, and easier to chew and swallow. 70/30 is my favorite, as burgers made with it are very juicy, and when cooking over fire, that melting fat drips onto the fire and produces flavorful smoke.
Pure Angus – Angus is a breed of cattle, and has earned a good reputation. However, All Angus is a brand name. It is very common in supermarkets. If you get your meat from butcher, ask what breed the meat comes from. There are better breeds than Angus, though lesser known to the general public.
Wagyu Beef – Wagyu beef is the American grown breed that is comparable to the famous Kobe Beef fro the Kobe valley of Japan. It is extremely well marbled, which gives it exceptional flavor and texture. Why anyone would turn this expensive meat into ground beef is a mystery to me. Everything that makes it special is lost.
Grass fed beef. All cattle is grass fed for most of their lives. Some beef (a lot of it ) is put into finishing pens where the cows are fed grains, or corn to fatten them up before selling. Many people prefer the flavor of corn finished beef, while others say that all grass fed beef are a healthier option. It’s really a matter of personal taste.
Ok, which is best for sloppy joes? Since the meat is used in a flavorful sauce, it needs to have enough flavor of its own to contribute to the recipe. But then again, since you are tasting much more than the beef, don’t use the most expensive beef you can finds. Me, I use ground chuck,70/30, just not the stuff in the plastic tube. That is usually low quality meat. I prefer the flavor of corn, or grain finished beef.
Wanda, you have a question? Why don’t we want to use tomatoes?
Tomatoes are high in potassium, and phosphorous, which is a problem for people with kidney problems, especially ESRF.
2 cloves fresh garlic, minced, or ½ tsp. Granulated garlic powder
½ yellow onion, peeled and minced1/4 cup Russian, or Catalina Salad dressing
2 tbs. Honey, or 3 tbs. brown sugar
3 tbs. A1 brand Steak Sauce
½ cup water
2 tbs, cooking oil
½ tsp. Salt
1 tsp. Coarse ground black pepper
Peel and mince the garlic. Peel and mince the onion. Place the sauce pot onto the stove top over medium -high heat. Add the oil to the pot. When it starts to shimmer, add the onion to the pot. Stir for 2 minutes. Add the garlic. Continue stirring another three minutes. Add the ground beef, breaking it into small bits. Season with the salt and pepper. Stir until lightly browned and cooked through. Add the remaining ingredients. The sauce will be very watery.
Continue boiling the mixture to reduce the water, and thicken the sauce. As the water boils off, it distributed the flavors evenly into the dish. It also helps make the meat more tender. This process will take anywhere from seven to ten minutes. When the sauce is thick and rich, taste it and correct the seasonings to your taste. Serve on soft buns with some good cole slaw. I know you will love this recipe. It’s way better than the stuff from the can, in my opinion anyway. Enjoy.
May your hot things be hot, your cold things be cold, and your cheddar be served at room temperature.
“No success outside the home can compensate for failure within the home.”
From the Kitchen of Chief Longwind of the North
If you love his, share it with family, and friends:
Well Casey, today’s lesson will prove to you that special diets don’t mean boring diets. We will be making sweet & spicy, Country Style ribs that are supremely tender and juicy.
Yes Raul; we are talking hot-spicy? Why it just so happens…
So, How are we going to do this? We will make them tender and juicy by braising them slowly in their own juices. We will add flavor with a wet rub.
I see a couple of hands up. You first, Doug. What’s braising?
Brasing is a cooking method done in a slow oven, between 220, and 300 degrees Farenheight. The meat is either partially, or completely submerged in a flavored broth, or water, with a lid placed on top of the cooking vessel. Another braising method is the one we will be using, where the meat is slathered with our wet rub, and sealed in foil, again cooking in a slow oven for four hours.
Ok, does that explain it well enough? Good. Next question What is a wet rub?
A wet rub consists of herbs, spices, and some kind of liquid, just enough to make a thin paste. The liquid can be water, prepared mustard, honey, or syrups. This is rubbed all over the meat before it is placed into the cooking container.
Place a two foot sheet of foil into your baking pan, pressing down the sides. . Rub the wet rub all over the ribs. Place each one into the pan. Fold the foil ends together, and crimp to seal. Press the sides together and crimp to seal. Place into the oven and set timer for 4 hours.
When the timer sounds, remover the ribs from the oven, carefully open the foil, as you will still be using it. Turn off the oven.
Remove the ribs from the pan and onto a clean plate. Pour the juices from the foil into a saucepan. Place the ribs back into the foil-lined pan, reseal, and put back into the oven to stay hot.
Add 1 cup of water, and a half cup of Orzo, or you favorite pasta shape into the saucepan. Bring to a simmer and cook for 10 to 12 minutes, or al dente. Serve with the ribs, and steamed green beans. Yum!
May your hot things be served hot, your cold things be served cold, and your Gouda be served at room temperature.
There is no success outside of the home that justifies failure within the home.
Seeeeeya Chief Longwind of the North
If you love his, share it with family, and friends:
Summer is just around the corner. With the warmer weather, it’s the perfect time to break out out the grill. A perennial favorite is, wait for it Tori, smoky spare ribs. Though the baby-back ribs are all the rage these days, meaty spare ribs are less expensive, and have more meat on them. When treated properly, in my humble opinion, they beat baby-back ribs for flavor and texture any day of the week.
As every barbecue pit master will tell you, phenomenal ribs take a day’s worth of loving care in a smoker that will cost you a month’s salary, with three hundred pounds of hardwood fuel, right. Wrong. I’m giving you a recipe that will produce fall-off-the-bone tender, juicy, and succulent ribs that require a night in the fridge and 40 minutes in a covered kettle or gas barbecue, and a few sticks picked up from the woods, or a bag of cheap apple wood chunks that can be had at the supermarket.
Here’s how I did them two days ago, to rave reviews from guests and family alike (I was told by one guest that these were the only ribs she’d ever had that required no sauce, and by my wife that they were the best ribs she’d ever eaten). Best of all, these are easy to make, and inexpensive. Now what more can a guy ask for?
Smoky Spare Ribs
Ingredients:
2 racks pork spare ribs
3 tbs. salt
4 tbs. mild chili powder
1 cup dark brown sugar
1 tbs. granulated garlic powder
2 tbs. granulated onion powder
1 tbs. rubbed sage
Wood chunks/branches cut into 6-inch lengths, apple, maple, hickory, mesquite, cherry, or tag-alder wood.
Combine the salt, chili powder, brown sugar, garlic, onion, and sage in a bowl and blend together until evenly mixed. Lay out the ribs on a covered working surface. Using a paper towel for gripping, remove the silver-skin from the ribs. Rub both sides of the ribs with the dry rub. massaging the seasoning mixture into the meat. Place in a suitably sized plastic bag, and seal. Refrigerate overnight.
To cook, place the ribs into a large roasting pan, cover and place into a 200 degree oven for eight hours; or, place into and electric turkey roaster, set for 200 degrees, and let it hang out for eight hours or so. An hour before serving time, Put charcoal in two piles on opposite sides of the grill. Make a drip pan that is equal in size to the ribs. add 2 cups of water to the drip pan. Fire up the barbecue and let it heat up for 15 minutes. Place the wood on top of the charcoal, or wrap in heavy duty foil and put on the fire Place the ribs on the grill. Cover and reduce heat by either closing all vents by half on the charcoal grill, or at lowest setting on the gas grill. Let the ribs cook in the smoke for 45 minutes. Remove and serve with your favorite barbecue sauce.
Alternately, stat the uncooked ribs on the grill, cooking with the lid vents half closed for six hours. You will have to add charcoal every now and again. Make sure the ribs sit over the drip pan. Add water to the drip pan once every 2 hours or so, to maintain about a cup of liquid. This liquid can be used to make a great BBQ sauce.
After the six hours have passed, remove the ribs onto a large sheet of heavy aluminum foil. Place back onto the grill with the vents still half closed. Cook another two hours. Remove and plate. Serve with Cole Slaw and your favorite dialysis friendly sides, like maybe grilled, honey glazed carrots, or grilled zucchini, or yellow squash, maybe a veggie kebab of pearl onion, carrot, and squash, all dusted with Parmesan cheese, and pepper.
This meal is so good, you no one will know that it is dialysis friendly.
My Favorite Cole Slaw
I prefer juicy to creamy Cole Slaw. I want it ice cold, and refreshing. It cleanses the palate and refreshes, especially when eating rich foods like ribs.
My favorite slaw is very juicy, to the point where you could drain off liquid from the bottom. I shred a head of green cabbage, along with two large carrots, and one yellow or white onion. They must be grated to make the pieces small enough for this to work. I add Miracle Whip, 1 tbs. sugar, and stir, making sure that there is enough salad dressing to coat the mix. Add 1/2 cup ice water and refrigerate for 2 to 3 hours to let the flavors combine This slaw tastes nearly identical to a famous chicken chain cole slaw, but is much easier to make. It really almost quenches the thirst with each bite, and doesn’t leave a fatry aftertaste. You can add chopped appel, raiseins, and or nuts if you so desire. But that’s just how I like it.
May your hot things be served hot, your cold things be served cold, and your Gouda be served at room temperature.
There is no success outside of the home that justifies failure within the home.
Seeeeeya Chief Longwind of the North
If you love his, share it with family, and friends:
Today, we are going to get serious, and make a meal worthy of a holyday meal. And yet, it is eeeeeasy to make There aren’t a lot of ingredients, and is accompanied by some great, ESRD friendly sides.
He star of today’s recipe is called a Roulade, wich is a french word. In Germany, it’s called Rouladen.
Jasmine, you have a question? What is it?
Here’s my definition:
Roulade/Rouladen – a chunk of meet usually round, butterflied to form a flat, uniform chunk of meat, coated with a stuffing mix, either savory, or sweet, and rerolled, tied with butcher’s twine, and roasted wit, or without a glaze. It can also be made starting with boneless, flat cuts of meat, such as round steak, brisket, pork belly, etc.
Does that answer your question? Good.
Today, we will use a three pound pork loin, and tun it into a flat piece of meat. You could, if you wanted, use a pork belly, trimmed of all but a quarter inch of the outside fat.
You may not have one of the tools that will make this recipe foolproof, a good meat thermometer. They aren’t expensive. The best kind have the thermometer base, with a magnet on the back, and a long probe that goes into yhe meat while it’s roasting. Some even have a remote alarm that you can stck in you apron pocket, that will tell you when the meat is at the correct temperature. I have one of those, It allows me to smoke a 20 pound turkey to perfection on My Weber Charcoal grill. Get bone. You won’t regret it.
Ok, on with the recipes.
Note: you will be baking corn puding at the same time that the roast is roasting, so prep both recipes before placing either onto the oven.
Core and peel the apples. Save the skin (its where much of the apple flavor comes from. Pace ½ cup of water into you pot over medium-high heat. Add the skins; bring to a simmer. Cover and cook for ten minutes.
Dice the apples and plce in cold water with a splash of lemon juice to prevent browning.
Using a sharp knife, cut a slit the length of the roast, about a half inch deep. Turn the knife sideways to the slit, and cut a half inch layer all the way around, until the roast is like one flat piece of meat. Season by sprinkling on half of the salt and pepper.
In a clean saucepan, melt the butter for the stuffing (2 tbs,). Drain the apples and add them to the melted butter. Put in the cinnamon and sugar; Saute until the apples are tender. Stir in 2 tbs. Of flour to form a paste around the apples. Let cook for five minutes over medium-low heat.
Slowly stir in the water from the boiled apple peels to form a thick sauce, like for an apple pie filling. Let cool for ten minutes.
Line a baking sheet with foil, or parchment paper. Trust me, this will make clean up esay. Cut butcher’s twine into pieces 6 inches longer than th width of the meat, making enoufh to space the twine lengths evry 3 inches for the lngth of the roast. Spread the apple fillin onto 2/3rds of the pork. Jelly-roll it back into its original shape. Tie the twine around it to hold the shape. Rub butter all over your roast, and season with the remaining salt and pepper. Lightly sprinkle smoked paprika over the roast. Insert the thermometer probe in the middle of the roast, with the tip going to the center. Set the alarm to go off at 143 degrees F.
Place into your oven and walk away until your thermometer alarm tells you it’s done. Remove te roast, turn off the oven, and let it rest for 15 minutes.
While the roast is resting, it’s time to make the side dishes,
Corn Pudding
Unless your from the Southern U.S., you may not have ever had corn pudding. It’s not the same thing as creamed corn. It is rich, and deliciousn and can be doctored to for your tastes. Best of all,it’s super easy to make,
Rub the inside of the casserole dish liberally with butter. Combine all of the wet ingredients in your mixing bowl. Whisk in the sugar, cornstarch and nutmeg until completely incorporated. Melt the softened butter and whisk into the mixing bowl. Fold in the corn. Pour into the casserole dish. Place into you oven with the roulade. Use the bottom rack for the roast, and the top for the corn pudding.
Next side dish, Ginger/Balsamic Brussels Sprouts.
I know what you’re thinking, Roy; Brussels Sprouts! I hate Brussels Sprouts.
As a child, I hated them to. They ere often bitter, and just didn’t tasdte very good. Sometimes, they were just awfull.
I’m happy to say that this veggie is now tasty. Brussels Sprouts are miniature cabbahes after all. Selective breeding has eliminated that nast bitterness. Bst of all, this veggie is a nutritional powerhouse that is safe for that special diet. So let’s make this recipe.
Tools: frying pan, stirring spoon, measuring spoon, sharp knife (santoku, or chef’s knife works well for this)
Ingredients:
½ cup Brussels Sprouts per personal
3 tbs. Modena Balsamic vinegar
2 tbs. Butter
¼ tsp. Ground ginger
Cut the sprouts in half. Heat the butter in the frying pan over medium heat. Add the sprouts to the pan stir them around every 3o seconds or so until yhey lightly star to brown. Dd the vinegar and ginger. Stir to coat the sprouts. Cook over low heat for five more minutes. Remove from the heat and place in serving bowl.
Ok. That’s all of it. Nd you know, if you don’t want apple stuffing in your roulade, you can use pear, or peach, or a savory stuffing like a good bread dressing, you know, like what you make with a turkey. If you do want a bread stuffing (or cornbread stuffing) stay away from the boxed stuffing mixes as the contain lots of sodium, and added phosphates.
Serve this with a cold, homemade strawberry shake. Use rice milk instead of milk.
ESRD Friendly Strawberry Shake
2 cups fresh strawberries, hulled
4 cups ice cubes
½ cup heavy cream
2 cups rice milk
1 tsp. Vanilla
Stevia sweetener to taste.
Place all ingredients into your blender. Blend at highest speed until smooth. Enjoy.
May your hot things be served hot, your cold things be served cold, and your Gouda be served at room temperature.
There is no success outside of the home that justifies failure within the home.
Seeeeeya Chief Longwind of the North
If you love his, share it with family, and friends: